Many people don't know what roof flashing does or why it's necessary. In this article, I'll explain how roof flashing can protect your home from water damage and other issues. Learn why roof flashing is important and the most popular types.
Understanding roof flashing and how to use it properly can help homeowners prevent water damage. The right roof flashing will keep water out and reduce roof repair costs. With today's innovative materials, you're sure to find something that meets your budget and aesthetic needs.
Learn about roof flashing to prevent water damage in your home. This article will help you choose the best roof flashing for your home so you can make an informed purchase. Let's learn about roof flashing's magic. Read more to discover what is roof flashing and why is it important.
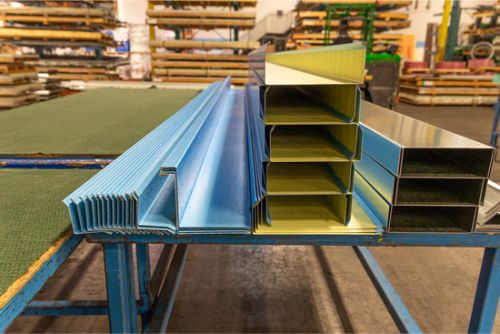
Roof flashing is essential. Metal sheeting protects roof edges and corners from water damage. This protection is crucial in rainy or snowy areas. Copper, aluminum, galvanized steel, stainless steel, and lead-coated copper can be used for roof flashing. It fits different roof structures in many shapes and sizes.
Metal roof flashing is most common today. The pieces are usually installed around chimneys, pipes, drain spouts, and other roofline protrusions that could let water in if not properly flashed. Metal flashing has been shown to prevent water infiltration better than asphalt shingle installations, which lack this waterproof barrier at their edges and corners.
Proper installation and maintenance will protect your home from costly water damage caused by faulty roofing systems. Preventing leaky roofs, wet basements, and moldy interiors will save you money in the long run. How does roof flashing protect your home?
Roof flashing is probably familiar to you, but do you understand how it protects your home? Roof flashing covers chimneys, walls, and valleys. It directs water away from these areas and onto the roof, preventing leaks.
Roof flashing should keep water out, preventing mold growth and other costly repairs. Good flashing also protects your roof from wind-blown rain, which can cause major leaks.
You can prevent roof leaks by installing all necessary parts correctly. Proper flashing installation will give you peace of mind that you're doing everything possible to protect your home from costly water damage.
Flashing prevents roof water damage. Roof flashing materials have different benefits. Skylight flashing protects skylights from moisture. Its aluminum or copper construction makes it weatherproof. Metal flashing protects against wind-driven rain and ice dams. This galvanised steel sheet flashing protects shingles from walls. Copper roof flashings are durable and corrosion-resistant. Copper's patina makes it attractive and strong.
Proper installation ensures roof flashing effectiveness regardless of material. Next, we'll cover how to install these materials on your roof so you can rest easy.
Flashing a roof protects it from water damage. Flashing keeps water out of roof joints and cracks, preventing costly repairs. Roofs are protected by step, edge, and valley flashing. Step flashing is used around chimneys, dormers, and other angles. Edge flashing seals gutters and eaves. Valley flashing spans roof valleys.
To prevent water from leaking into the structure below, flashing must be sealed with caulk or waterproof tape when installed on a roof. Before finishing each piece, all flanges must be tucked beneath shingles to prevent gaps. After taking these steps, you'll feel confident that your property is protected from moisture damage. Let's examine some benefits of using steel and aluminum for these materials...
Steel and aluminum roof flashing have many benefits. Understanding these metals' properties helps you choose a product. aluminum is lightweight, malleable, corrosion-resistant, and recyclable, while steel is stronger, more durable, and more temperature-resistant. Both metals can be bent into intricate designs to meet specific needs.
Steel and aluminum have high ROIs due to their durability and cost-effectiveness. Steel's high tensile strength allows it to withstand wind, heat, rain, snow, and hail without corroding or rusting, even when exposed to UV rays. aluminum does not need painting because it has built-in oxidation protection, preventing discoloration from prolonged exposure. Both materials are stable in price and last longer than other flashing materials, making them more affordable for homeowners.
Builders and contractors prefer steel and aluminum because they can withstand harsh weather and look good. These two metals make great roof flashing materials due to their versatility, durability, and affordability. Knowing these advantages will help you learn more about what is roof flashing and its importance.
After discussing steel and aluminum flashing's benefits, let's install it around chimneys. Roof flashing around chimneys is difficult but possible with knowledge and skill. Chimney flashing should direct water away from the house. This prevents leaks and home damage.
First, secure the chimney flashing base. The roofing material and metal flashing should not have gaps. Before installing chimney flashing, caulk gaps. After this, measure and cut your flashings. For maximum water protection, attach these pieces flush against the chimney's top edge.
Finally, check all connections for gaps to prevent rainwater from entering your home. In areas where joints may separate due to vibration or temperature changes, caulk may be needed. This protects you and your property from water intrusion.
Caulk seals roof leaks easily and effectively. To ensure long-term protection, you should take additional steps after caulking. Counterflashing, which separates shingles from other roofing materials, can be used with caulking to seal any gaps. If these measures are not taken, then water could seep into your home, resulting in costly repairs.
Caulk and counterflashing can seal leaks for homeowners without the time or money for major roof repairs. This method protects against weather damage but isn't as strong as professional repairs. In extreme climates, caulk may not be enough to insulate against cold and heat. Combining both products for durability is advised.
Used roof systems benefit from caulking around exposed nails from years of wear. Even if your roof system has seen a lot of use, adding an extra layer of leakage protection now is a smart investment for its future health. Preventative measures like caulking will help keep everything running smoothly between routine maintenance and inspections.

Maintenance and inspections are crucial after caulking your roof. Roof flashing prevents water damage. Flashing is used in valleys, chimneys, pipes, vents, and skylights where two planes meet. It keeps moisture out of vulnerable areas, preventing future issues.
These flashings should be checked every few years for wind and ice damage. Replace rusty or cracked parts before they cause more damage. When replacing flashings, pay attention to how they were installed—poor installation can be as damaging as no flashing.
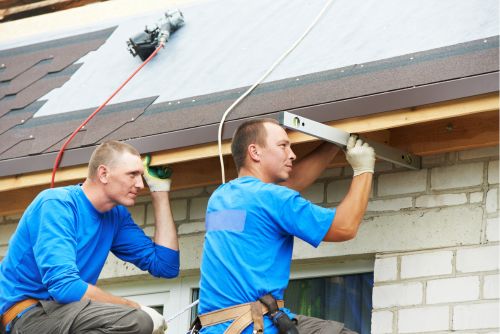
Professional contractors ensure proper installation to avoid costly repairs. Professional contractors also know which materials work best in different climates and can advise on year-round preventive maintenance. We'll discuss why professional installation may help prevent roof water damage.
Roof replacement requires flashing. Flashing keeps water away from roof vulnerabilities and prevents leaks. Despite the many DIY videos online, professional installation of this vital component has many benefits you may not realize.
First and foremost, experienced professionals know how to properly install flashing around skylights, chimneys, vents, and other protrusions for maximum home protection. They know about modern roofing materials like rubberized asphalt and copper sheeting, as well as the proper measurements for these installations. This ensures that new flashing covers all areas, keeping your roof secure during heavy rain or high winds.
When installing new flashing, professionals consider surrounding structures and trees, which can protect your home from debris buildup and wind-driven rainwater. Instead of using makeshift solutions that could lead to costly repairs, licensed contractors use specialized tools like caulking guns and sealants to get the job done right.
Professional roof installation is invaluable. Their experience, expertise, and cutting-edge equipment will keep your roof moisture-free for years to come. Avoiding common flashing mistakes should help ensure proper installation without issues.
After discussing professional installation's benefits, let's discuss roof flashing mistakes to avoid. Flashing installed improperly can cause water leaks and other costly damage. Take time and do it right.
Before attaching metal flashing to walls, homeowners often forget to seal it. Water can leak into wall cavities and cause structural damage without a good sealant. Use tar around all joints to prevent moisture infiltration.
Checking the roof deck pitch before installing roof flashing is another common mistake. If you're renovating an existing structure, previous repairs or renovations may have altered it. Make sure there isn't too much slope so water flows away from skylights and dormers instead of pooling and causing problems.
Finally, metal flashing gaps must be checked. Water can enter these small spaces and damage your home's walls or foundation. After each installation step, a thorough inspection should be performed to identify and fix these issues before they become larger issues requiring more extensive repairs and replacements.
Roof flashing must be repaired or replaced after weather, wear, or other damage. To determine repair needs, know the materials used. Aluminum, copper, PVC, rubberized asphalt, and fiberglass are common materials. Your roof flashing system's material will determine how to repair or replace it.
Replace roof flashing pieces exactly to avoid gaps that could cause further damage. While inspecting your roof flashing system, repair any cracks or holes before water can enter and damage your home. Preventive measures like these save time and money.
For successful roof flashing system installation, choose a professional. Before making a decision, get multiple quotes from qualified contractors with experience in these projects.
Roof flashing requires the right professional. After all, good roof flashing prevents water damage and saves energy. Researching this type of contractor is crucial.
First, find a valley, area, or material roof installer with experience. Ask friends, family, and neighbors who have had similar projects done by recommended professionals. Compare prices and services from at least three contractors. Before committing, check each contractor's license and insurance.
After narrowing your search, contact each one and ask about their experience with specific materials and installation methods, as well as their warranties on labor and products. Do they need ladders? Scaffolding? Does the quote include these items? Finally, visit the contractor's previous job sites to see how they measure angles, cut pieces, and install components.
Finding a skilled professional who pays attention to detail and offers competitive pricing will ensure your roof flashing installation lasts for years. Remember that investing in high-quality materials and skilled labor now can save money in the long run by reducing the need for repairs.

After choosing the right installer, consider the roof flashing project costs. Any roofing system needs flashing to drain water and keep moisture out. It protects a roof from the elements, extending its lifespan. Flashing materials vary by application and budget.
Metal pieces are usually preferred because they're long-lasting and corrosion-resistant, but plastic pieces are available if cost is a major factor. Due to their lighter weight, aluminum sheets may be cheaper pound-for-pound than copper sheets. To choose the best option, weigh its pros and cons. Before choosing a material, consider installation labour costs.
Quality materials cost more, but they last longer and cost less to replace. Instead of galvanised steel, use stainless steel or zinc alloy for durability and rust resistance. It's up to you, so pick wisely. You should be able to find a good flashing roof solution if you consider cost factors.
With the right tools and materials, installing roof flashing can be easy. First, measure how much flashing there will be and where it will go. The best materials are galvanised steel or aluminum.
Installation is easy after that. Installing on two roofs of different heights usually requires an L-shaped flashing to fit the angle. Place this at the roofline intersection. To prevent leaks and draughts, nail it down.
Before finishing, seal all edges to prevent water damage. Your hard work will last. With these tips, you can confidently flash one or two roofs. Long-term water damage prevention tips are coming.
Proper flashing installation prevents roof water damage. Skylights and roof valleys are covered by metal or plastic roof flashing. Piece-flashing protects joints from water. Choose copper or aluminum flashing for long-term water damage protection.
Even with high-quality materials, regular maintenance is necessary for security. This requires checking flashing points for wear and making repairs before problems worsen. If possible, add sealants or underlayments for extra waterproofing. These can prevent ice dams and other extreme weather conditions from leaking through your roof.
Quality flashings are important, but they need care too. Water damage can be prevented with regular inspections and sealant applications. With these tips, you can rest assured that your home is protected from unexpected moisture intrusion and costly repairs.
Thus, roof flashing is essential. It protects the roof from water and extreme weather. Budget and building needs determine the best roof flashing material. Roof flashing costs $1–3 per foot installed. To prevent leaks and other issues, inspect the flashing every two years. After reading this article, heaps of information about what is roof flashing has been given.
DIY tips for caulking small cracks or holes are available. To ensure sealant adhesion, clean the surface first. Second, use a caulking gun to evenly cover the crack or hole. Before caulking, use masking tape to ensure a neat finish.
Finally, wear hard hats and gloves when working on your roof, including installing new flashings. This will keep you safe and prevent common mistakes when working at heights, such as dropping items off the edge or stepping on weak roof structures, which could cause further damage or injury.
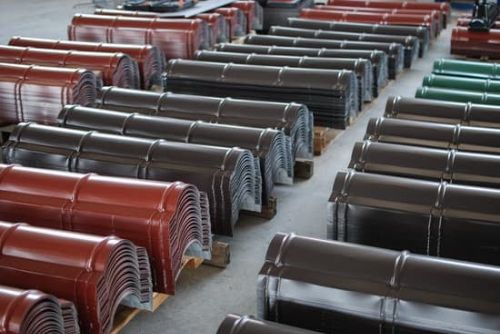
Roof flashing materials vary. Each material, from copper and lead to PVC and aluminum, has its own advantages that should be considered when choosing. I'll explain why each of these materials is good for roof flashing in this article to help you choose.
Copper flashing is the most popular because of its durability. Copper won't rust, keeping your roof in good condition year after year. Copper is also malleable, making it easy to shape for your job. Copper is expensive, but if budget isn't an issue, we recommend it.
Lead flashing, like copper but cheaper, is next. Lead is flexible and doesn't corrode, but it needs regular maintenance to look good. Thus, it would suit budget-conscious individuals who don't mind occasional maintenance.
Last but not least, PVC or aluminum flashings are inexpensive and weatherproof. PVC's vinyl composition makes it waterproof, while aluminum is strong but lightweight. They'll perform better and last longer than steel or zinc sheets.
As materials for roof flashing systems, copper, PVC, and aluminum all have their benefits. With careful research and consideration, you'll soon find which works best for you, giving you peace of mind that your home will stay water-damage-free for years to come.
Roof flashing is expensive but necessary to prevent water damage. Before deciding if it fits your budget, you should know the average cost of installing this protective material.
Roof flashing installation costs depend on job size, complexity, and materials. Standard installations typically cost $3–5 per linear foot. Installing 100 feet of roof flashing could cost $300–500. Labor costs and local regulations may change the amount.
Fortunately, these costs can be reduced. Many professionals offer discounts for multiple services, and some offer special financing so you don't have to pay out large amounts at once. Researching materials ahead of time can help you get the most for your money while staying within your budget.
No matter how much you spend on roof flashing installation, quality products that last financially and structurally will keep your home safe and secure for years to come.
Roof flashing inspection is often overlooked when maintaining a roof. Roof flashing protects vulnerable roof areas from water damage and rot, so regular inspections can save you money on repairs. How often should this vital component be inspected? Let's examine roofing flashing inspection and its importance.
Regular roof flashing inspections help protect vulnerable roof areas from moisture damage. This includes checking for rust and corrosion and sealing all seams and gaps. After severe weather, like hail storms or high winds, you should have your roof professionally inspected every two years. During these inspections, you need to make sure that:
A professional inspection will also check for installation or design issues that could cause future problems if left unchecked. They'll also determine if the flashing's caulking needs to be reapplied or replaced to prevent water infiltration through small cracks and crevices. Schedule regular inspections to catch potential issues before they become costly repairs.
Having a professional check your roof flashing twice a year (or after extreme weather conditions) can save you time and money by preventing minor damage from becoming major. Maintaining your home's structure isn't easy, but it pays off in peace of mind and money.
Many homeowners fear caulking leaks. If done wrong, you could do more harm than good. Don't worry—these DIY tips will help you finish the job.
Gather your supplies first. A caulking gun, silicone-based caulk, painter's tape or masking tape, and a putty knife are needed. Before caulking, clean the surface. To get straight edges after caulking, tape strips on either side.
Applying caulk is fun. Load your caulking gun with sealant from the tube. Squeeze a continuous bead of sealant on both sides of where you applied the tape with steady pressure. Take your putty knife and smooth the sealant's top to prevent water from seeping in during a storm. You've sealed those pesky leaks.
Caulking can be intimidating, but following these steps will make your next project go smoothly so you can keep your home dry and safe without breaking a sweat.
Avoiding mistakes when installing roof flashing can be difficult. Knowing what not to do is as important as knowing what to do. Here are the most important roof flashing considerations:
First, make sure all materials are compliant with your system. Water damage from mismatched components can ruin other work. Pay attention to the manufacturer's installation instructions, as even minor deviations can cause problems.
Installers often fail to seal flashings or chimney penetrations. Carelessness lets water seep into vulnerable areas and weakens structures. Use self-adhesive membranes and caulk sealant on flashing joints to weatherproof them and prevent leaks.
Remember annual maintenance checks. Even if everything looks good, inspect regularly for signs of deterioration caused by aggressive temperatures, UV radiation exposure, or windy conditions, which may affect your roof flashing system's performance and longevity. Keep these tips in mind, and you can rest assured that your home will be watertight for years to come.