Most people dislike removing roof shingles. It's necessary, but climbing up on the roof and dealing with all those shingles is scary. Removing roof shingles is easier than you think. Anyone can do this safely and efficiently with the right tools and patience. I'll show you how to remove roof shingles in three easy steps, so you can enjoy your new roof.
Seeing an old or damaged roof raises stress levels. You want something more attractive and practical, but replacing it seems too much. Fortunately, removing old shingles is easier than you think. A few simple steps can revitalize your home's exterior without breaking the bank.
If you're ready for a change but don't know where to start, read on: we've got everything covered, from safety tips to removal techniques, so by the time you finish this article, your old shingles will be a distant memory.
Shingles protect roofs from the elements. They're asphalt or fiberglass and vary in shape, size, and color. Shingles can overlap to strengthen and protect. Chimneys, vents, and dormers use step flashing with shingles. It prevents rainwater from entering the house by sealing the two surfaces. If you want to remove roof shingles yourself, you need these basics.
Before removing old shingles, check your roof for damage. Replace cracked or missing tiles around step flashings, skylights, and valleys before removal. Before continuing, hammer any loose nails through the existing shingle layers. These steps ensure safety while removing old shingles and preparing your roof for new ones.
Preparing to remove roof shingles can be a daunting task. Before getting started, it's important to have the right tools and materials on hand. Here are a few items you'll need:
Plan how to dispose of roof debris. Renting a dumpster makes disposing of everything easy. This method makes disposal faster and easier than carrying each piece down.
Before removing your home, check the neighborhood. Check for trees or other obstructions near the roof line that may impede your work. Clear these areas before removal. After following these steps and gathering the necessary supplies, you're ready to remove roof shingles.
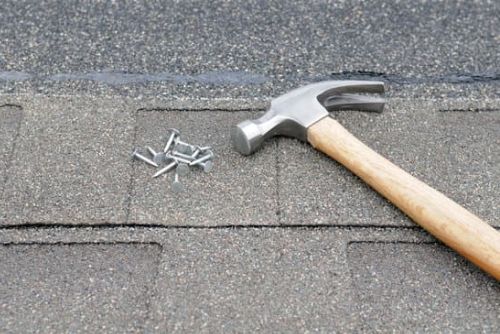
After preparing for removal, gather the necessary tools and materials. Gloves, eye protection, a pry bar or flat shovel, a hammer, roofing nails, a ladder, and a chalk line are needed. Rent an air compressor-powered nail gun to remove asphalt shingle roofs faster.
Wood shakes are brittle and break easily, so be careful when removing them. Handle them with heavy leather gloves. You'll also need a circular or reciprocating saw with sharp wooding them. Handle them with heavy leather gloves. You'll also need a circular or reciprocating saw with sharp wood-shaking blades.
Make sure you have all your tools before tearing off the roof surface, so you don't have to stop. Now let's talk about stripping the edges of shingles safely and efficiently.
I'll demonstrate roof shingle removal. First, remove the shingles. This part can cause damage if done incorrectly.
Get a putty knife, hammer, and pry bar. Lift one side of the shingle at an angle with your putty knife until it separates from its adhesive backing. After that, carefully slide the blade under each shingle to remove it without damaging it or your roofing system.
Remove any nails or staples holding the shingles to your roof deck with a hammer or pry bar. Avoid leaving sharp edges that could injure or puncture someone walking underneath. Simply discard them.
By following these steps, we can safely and efficiently remove roof shingles. Let's discuss how to finish this.
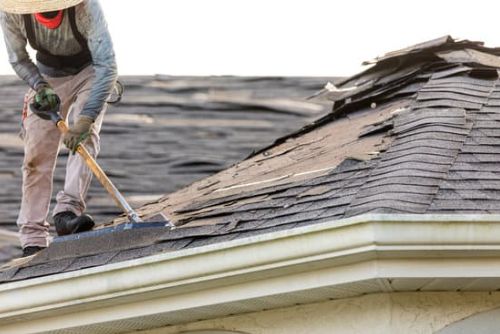
After stripping the edges, remove the shingles. This is essential for shingle installation. All methods of removing old roofing materials are more laborious than stripping the edge.
Hand-tearing roofing materials is most common. To avoid injury, wear gloves and goggles when tearing off roofing material. To loosen stubborn nails, you'll need a flat pry bar, hammer, or crowbar. Slowly remove your roof to avoid damage.
An electric saw or circular saw with metal cutting blades is another option. These tools can quickly remove large amounts of shingle material, but they are expensive and dangerous. Better safe than sorry—read up on how to use these tools before trying.
After debris removal, dispose of it properly. Proper disposal keeps your yard clean and reduces liability risks from visitors who may not realize the piles of shingles contain sharp objects. With some extra caution, you should be able to remove those old shingles in preparation for new ones.
Roofing requires removing old shingles. Now that you know how to remove roof shingles, disposing of debris safely is also important when working on your roof. Here are ideas on how to dispose debris properly:
First, remove the shingles with a tarp or plastic sheeting and place them where they can be easily collected and disposed of. This makes roof cleaning and disposal easier. Second, break larger pieces into smaller ones that fit into trash cans or garbage bags better. Finally, many cities recycle asphalt shingle roofs.
After collecting and sorting, safely lower debris from your roof with ropes or straps before removing it. If possible, let professionals carry heavy loads. After safely disposing of the old shingles, install new roofing material.

After removing the old roof, secure the new one. With the right tools and materials, installing new shingles is easy. First, gather your supplies. Before installing, ensure all components are present. To prevent water infiltration, seal existing flashing.
Install the underlayment properly next. Nail or screw the underlayment to the decking every few inches. After this, check each piece of underlayment for holes or weak spots where water could enter the home's structure. Before installing, fix any issues.
After all preparations are made, start laying down your new shingles from the bottom up in orderly rows using asphalt nails or staples per manufacturer instructions. Install replacement shingles now.
Replace the roof shingles after removing them. If done wrong, this step in roof repair or replacement can have serious consequences. Replacement shingle installation tips:
First, cover all exposed roof deck areas with tar paper and flashing tape. These materials will prevent water damage and stabilize new shingles. Choose high-quality asphalt shingles for your home's color scheme. Check for wind resistance and local building codes.
Finally, nail each shingle to the roof deck properly. Nails too close to the edge can damage the material. To prevent water runoff from above, nail heads should be slightly below surface level. These installation precautions will ensure your roof repair or replacement lasts for years.

The time has come to remove your old roof shingles and begin anew. Fortunately, the process of removing them is relatively straightforward – but it’s important that you take safety precautions and have some basic knowledge about proper nailing techniques. Here are four tips for ensuring a successful removal:
Flashings and sealants—which keep moisture out and protect against wind uplift—finish the job. Hire a professional who knows building codes and flashing best practices to install these materials.
After removing the shingles, install flashings and sealants. Flashings seal vents and chimneys to waterproof your roof. These protect your home from rainwater and leaks. To fit new roof flashings, measure carefully.
Choose flashing materials that match those used previously to ensure a waterproof seal over surface joints and gaps. Attaching these pieces requires roofing cement. Use roof-specific caulk for maximum durability.
After installation, double-check all connections and seams to avoid future issues. After installation, check each area for issues before moving on.

Now that you’ve finished the job of installing roof shingles, it's time to move on to checking for potential issues. Here are a few things to do:
This inspection may reveal damage that needs to be repaired before continuing roof maintenance. If you find significant damage, a professional can help diagnose the cause and advise on how to repair or replace it.
Roof maintenance is essential. To maintain your roof, you should follow these steps, whether you're replacing it or just repairing or replacing shingles.
Know when to replace roof shingles. If they're brittle, curled, or missing granules, they need to be replaced. Check your roof with binoculars from ground level or by climbing onto it if possible.
Old shingles can be removed easily. Anyone can do it themselves with the right tools and safety precautions. Start by removing any nails holding down the existing shingle strip, then remove each tab until all are gone. After clearing away debris, check underneath for damage like leaking flashing or animal holes before installing new shingles.
After this, installing new shingles is easier and faster than fixing old ones, which could lead to more expensive repairs if left unattended. Understanding the benefits of professional roofing services ensures optimal results and reduces risks.

After learning how to maintain your roof, learn about the benefits of professional roofing services. Roofers have years of experience replacing shingles. They can help protect your home from water damage by choosing the right material.
Professional roofers will assess your shingles and recommend whether to repair or replace your roof. Asphalt shingles are a cost-effective, long-term water-proofing solution. Asphalt shingles provide reliable weather protection, are durable, and are easy to install.
Professional roofers use specialized tools to safely remove old shingles without damaging the structure or stressing other parts of the building envelope. Homeowners can rest assured that their roofs are being properly maintained by trained professionals who know how to prevent water damage. Homeowners can avoid costly repairs due to negligence or improper installation by hiring professionals.
Investing in professional roofers gives homeowners peace of mind, superior results, and an affordable price—something everyone should consider when considering the cost of replacing roof shingles.
Replace the roof shingles to protect your home. Many factors can lower the cost of replacing these shingles. Budgeting for replacement shingles involves these factors:
Researching which type of replacement shingle is best for your situation and who offers competitive pricing and high-quality service is worth it. Understanding all of these aspects upfront will help you make informed decisions and maximize your investment. These steps will help your roof last longer and save you money. Replacing roof shingles doesn't have to be expensive or stressful with proper planning.
Avoid these roof shingle removal mistakes. Never remove old shingles from a working roof. It can cause serious harm. Instead, remove shingles safely with a modal window.
Second, do not hammer or otherwise damage your existing shingles. Instead of using force, use a crowbar to protect the shingles and remove them quickly.
Finally, replace the damaged shingles with enough material to cover the roof. Don't run out of materials halfway through the job. With these tips, you can safely replace your roof.
Finally, replacing roof shingles is a big job, so be prepared. Depending on the size of your home and how many shingles need replacing, it can take one to several days. Before making a decision, get quotes because prices vary. If you're not confident, hire a roofing service. After installing new shingles, regularly check your roof for damage. This will help your roof last for years.
With preparation and research, we can replace roof shingles successfully. Learning about installation materials and costs can save time and money. Remember: read up, ask questions, hire professionals, and get regular inspections to protect our homes from Mother Nature.
This information should equip you on how to remove roof shingles. With dedication and hard work, you'll succeed.
Replacing shingles is difficult. It requires patience, tools, and knowledge of the process. Let's examine how long it takes to replace those pesky shingles.
It depends on how many you need to replace, their material, and whether any repairs are needed. However, a single layer of shingles takes 1-2 days, and multiple layers take 3–4 days. This assumes you have all the supplies and equipment and know how to do the job.
With some research and care, anyone can replace their own shingles. Before leaving, fix any other issues, like broken flashing. Keeping things tidy will help the project go smoothly and quickly, so you can get back to enjoying your day.
Overall, replacing roof shingles isn't fun, but by planning ahead, we can speed up the process.
Before replacing roof shingles, know the cost. Understanding materials and labor costs will help you decide whether to replace broken or damaged shingles, all shingles, or renovate your home. These factors can affect your total costs:
Budgeting for roof shingle replacement should include these factors. Get quotes from multiple contractors to find one that fits your budget and delivers quality results. Asking about warranties could save you money if something goes wrong. Planning and research can help your roof replacement project run smoothly and on budget.
Should a professional roofer replace roof shingles? Not always. Your situation and work dictate it.
Construction and DIY experience may give you the confidence to do the job yourself. You'll save money and feel accomplished by doing it yourself. If you lack the skills or knowledge for this type of job, hiring a professional may be best.
Professional roofers guarantee long-lasting results and expertise. They know local building codes and installation standards, so your new roof will be safe. Most companies also offer warranties, giving customers peace of mind that installation issues will be resolved quickly.
So depending on how much time and effort you want to put into replacing your roof shingles, hiring a professional may be worth it—financially and safely.
Post-installation issues? Ask before removing roof shingles. After all, nobody wants expensive repairs to go wrong. Let's examine some roof installation issues.
Poor installation and maintenance are common issues. If the roof isn't installed properly, it may not withstand strong winds, snow, or rain. If you don't regularly inspect your roof for damaged shingles and remove debris, serious damage can occur, requiring costly repairs.
Finally, poor flashing around chimneys, vents, etc. causes water leakage or moisture buildup in the rafters. Use high-quality materials and a professional roofer who knows how to flash these areas to seal them from precipitation and other elements to avoid these issues during or after installation.
In summary, taking the necessary steps before starting roof work will ensure that everything runs smoothly and that no unexpected issues arise.
Maintenance includes checking your roof for damage. Regular inspections can catch problems early and prevent costly repairs. Depending on age and condition, inspect your roof at least once or twice a year. Doing so will help detect shingle wear, water pooling, and other issues.
First, inspect the gutters, eaves, chimney caps, and valleys for cracks or discoloration. Replace these areas if they're worn or damaged. Next, check the flashing around vents and skylights for gaps or rust spots, which could indicate rain or snow melt infiltration. Finally, if the roof is sagging, it may be due to poor structural support underneath.
How often you inspect your roof depends on your home's environment. Since wind-borne debris can damage homes quickly, homes in hurricane-prone areas must be inspected more often. By being proactive and checking your roof system regularly, you can save money and keep your family safe.