How To Start Shingling A Roof
Want to learn roof shingling? Are you looking for a novel way to work more efficiently? Helpful article. I'll teach you how to shingle a roof, from gathering materials to calculating measurements to laying the first course.
These simple steps can teach anyone how to shingle a roof. Let's begin—don't be afraid.
Replacing roof shingles, whether for storm damage or maintenance, requires careful preparation. Some tips and tricks can help your project succeed. This article covers all aspects of how to start shingling a roof.
Overview Of Shingling
For weatherproofing, homeowners often shingle their roofs. It's cheaper than other roofing materials and easy to install. This article covers safe and effective roof shingling.
First, make sure your roof can handle shingle roofing without structural damage. Before starting, check for loose boards, damaged supports, and leaky gutters. If the house has a chimney, check its surroundings too. Before shingle roofing, these areas may need repairs.
After everything is safe, you can measure how much shingle roof material you'll need based on your roof's surface area. Before buying a shingle roof at a hardware store or online, consider asphalt, metal, cedar shake, slate, tile, and others.
The new shingle roof can be installed after all preparations are complete. Next, we discuss the tools and materials needed to do this correctly.
Materials Needed For Shingling
Now that we've covered shingling, let's talk about materials. When shingling, safety is a roofer's top priority. Valleys, roofing cement, and step flashing are needed. Valley flashing protects roof intersections from water. Roofing cement bonds flashing and other roof components. Step flashing protects sloped roof walls from water intrusion.
After getting your supplies, remove old material before installing new shingles. To prevent damage during installation, properly dispose of debris after removal. Before installing new materials, clean and dry surfaces. Start shingling now that you know what materials you need and how to prepare your workspace.
Safety Precautions When Shingling

Reroofing safety is paramount. Take safety precautions before starting any roof work. Here are some roofing-shingle safety tips:
First, secure your ladder before climbing. Installing shingles requires stability. Before starting, make sure all ladders are securely anchored. Wear non-slip shoes to avoid falls. Wear eye protection during installation because debris can fly off.
Finally, strong roofing nails and properly installed shingles will give the best results and weather protection. These will greatly reduce rooftop work risks.
After taking safety precautions, let's prepare the roof surface for shingle installation.
Preparing The Roof Surface
How to start shingling a roof? Start by preparing to shingle a roof. Make sure your roof is clean and secure before installing materials. Fix any weak spots before continuing.
To avoid going down, keep all roof installations and tools within reach. Time and safety could be saved. Also, secure your ladder. Work on slates and other roof materials is easier with rubber-soled shoes.
Spread drop cloths over nearby skylights and vents to avoid damaging them while walking up there. After finishing your list, install the starter course.
Installing The Starter Course

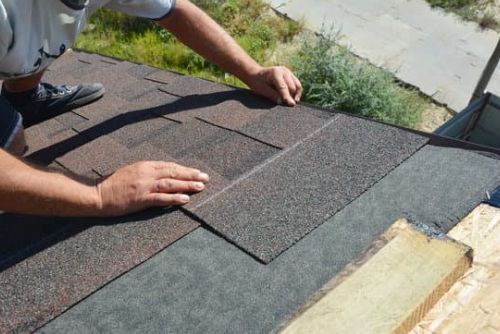
Shingle your roof now that you have the materials. Starting with the starter course installation. This step should not be skipped or rushed. Your roof's starter course of shingles shields its eaves from wind-driven rain.
First, install a row of regular three-tab asphalt shingles on each side of the lowermost edge for the starter course. Make these rows flush with the edge to form a neat line along its sides. Secure installation may require additional nails. Next, apply starter shingles designed for this purpose. These will slightly overlap and provide stability along your roof's edge.
Apply adhesive to ensure proper adhesion between all parts for maximum waterproof efficiency once everything is secure and lined up. Don't forget—keep going. When done right, valleys and ridges can produce stunning results.
Working With Valleys And Ridges
Address valleys and ridges when shingling a roof. The roof ridge is the highest point where two sloping sides meet. This part of the house's shingle security affects your roof's weatherproofing. Start by nailing starter strips to both sides of the ridge. After installing these, add three-tab asphalt shingles to each side's bottom. Make sure they overlap six inches over the ridge centerline. Continue up each side of the ridge until all is covered with overlapping layers, using more roofing nails for security. If your roof has multiple intersecting ridges, cut them to fit snugly and not move around when installed. Finally, lay another course of three-tab asphalt shingles along the top of both sides to cover any gaps between the courses below and complete the look. This prevents water from damaging those areas.
Sealing Nails And Joints
After valleys and ridges, seal nails and joints to shingle a roof. It keeps your roof watertight for years.
Installing shingles starts with nail placement. Use a hammer or nail gun. Make sure each nail is securely fastened and seated into the decking beneath the roof sheathing. If any nails are exposed above the shingle, they may catch on windy days and damage your roof.
After nailing them, seal them. Use high-quality caulk around nail heads and at shingle seams. To prevent leaks from moisture, seal these areas. Finally, use a high-quality asphalt-based sealant around each row of shingles to keep rainwater out and strengthen their bond against strong winds.
After sealing everything, apply adhesives to secure your new shingles even more.
Applying Adhesives To The Shingles
Adhesives are crucial before shingling a roof. Adhesives keep asphalt shingles on the roof for years. This adhesive also protects against wind and hail.
Start with an approved roofing adhesive or tar-based sealant. This product offers maximum protection and flexibility when installing shingles. Apply these products evenly across each row of shingles—don't forget the gaps between rows. Use a brush or roller to apply adhesive more evenly.
Finally, let the adhesive dry before cutting and notching your shingles. Make sure all the edges are sealed to prevent water from seeping into your new shingles. Careful preparation and adhesive application will give you a secure, long-lasting top roof. Let's remember that adhesive is essential to shingle installation as we continue our project.
Cutting And Notching The Shingles
Installing roof shingles is hard work, but the results are worth it. Cut and notch the shingles before starting. Here’s what you should know:
- Cut the Shingles:
- Measure each row of shingle before cutting it with a sharp utility knife or scissors.
- Be sure to wear safety glasses when working with any kind of blades or tools.
- Using chalk can help ensure accuracy when marking where to cut in order to fit around chimneys, vents and other obstructions.
- Notch the Shingles:
- Start by cutting out one section at an angle from the corner edge of the existing tab so that they overlap properly along both sides.
- Prime & Seal:
- After everything has been cut and notched correctly, prime and seal all edges using liquid asphalt primer for extra protection against moisture damage over time.
- This step is important for ensuring longevity of your roof installation project.
After these steps, finish your roof.
Finishing Touches On Your Roof
Finish cutting and notching your shingles. To do this properly, you'll need to install drip edges along the eaves and roof shingle starter strips at the edges and corners.
First, install drip edges on each eave. This will help prevent roof water damage by increasing rainwater runoff. In windy conditions, secure the drip edge with nails or screws.
Install roof starter strips. These shield shingles from moisture and debris by separating them from siding or stucco. They stabilize shingles in high winds and other extreme weather. Use enough nails or staples to secure the starter strips.
Finally, while some roofs require less preparation before installation, all shingles must be laid carefully and evenly across the entire surface area for optimal water damage protection over time. Finishing touches can make or break your new roof's weatherproofing. Let's finish our project with steep slopes.
Working With Steep Slopes

Managing a steep roof is difficult. To do it safely and correctly, you need skill, knowledge, and tools. Make sure your steeply sloped roof has an edge, or eave, before shingling. Working on an incline will be more stable. Before working, install metal flashing along the roof's edges if there is no edge or eave.
Next, check your nails, shingle tabs, sealant, and tar paper. Local building codes for metal roof installation can vary by region and municipality. Follow those guidelines so your project meets coding standards.
Finally, work carefully on steeply sloped roofs due to the higher risk of falling. Metal roofing installations require accuracy, so wear rubber-soled shoes, take breaks, and don't rush. You'll master even the hardest high-slope projects with care and attention to detail. Next, avoid common mistakes.
Tips To Avoid Common Mistakes
After you've mastered steep slopes, start shingling your roof. Before installing roof shingles, there are some tips to avoid common mistakes.
- Mark a chalk line on the deck boards before nailing down the first row of roofing shingles to ensure straight rows. When working with steeply sloped roofs, visual distortion can cause alignment issues if not done properly.
- Second, installing in good weather is essential. Changes in temperature and wind speed can affect asphalt-based shingles' adhesive strips and make them more susceptible to uplift.
- Finally, use enough fasteners to secure each row of shingles to the deck board surface to seal your home from moisture.
These simple steps will reduce project start-up errors. Metal panels or composite materials can make replacing shingles easier with a little planning and precaution.
Alternatives To Traditional Shingles
Roofing requires installing shingles, and there are several alternatives to asphalt shingles that may work better for your project.Here's a list of four options:
- Architectural Shingles - These shingles offer a more distinctive look than regular 3-tab shingles, with multiple layers providing extra durability and protection from weather damage.
- Metal Roofing - This type of roofing can last up to 50 years or longer and is available in various colors and styles. It provides superior resistance to fire, wind, hail, snow, and other natural elements.
- Slate Roofs - Slate roofs provide timeless beauty with their unique patterns and textures as well as being extremely durable when installed properly. They require minimal maintenance but do need professional installation due to weight considerations.
- Clay Tiles – Clay tiles create a classic Mediterranean style home appearance while also offering excellent insulation properties. They're relatively low maintenance compared to other materials but they’re not ideal for all climates as they can crack if exposed to extreme cold temperatures over time.
It's important to consider the long-term costs of each roofing material, including installation, replacement, energy efficiency, and maintenance. Planning ahead will help you make the best decision now and in the future. With proper planning and consideration of these alternative materials for roofing shingles, you can rest assured that your roof is protected from rainstorms, heavy winds, and heat waves. After choosing the right roof material, let's talk about maintenance.
Maintenance After Installation

Maintenance is crucial after shingling. It will keep the roof looking good and prevent damage. To properly maintain your newly installed shingles, make sure all nails are secure, check for loose or missing shingles using a ladder, replace old shingles with new ones of the same size and shape as needed, use caulk around window sills, chimneys, and other objects protruding from the roof to seal off potential water leaks, and check gutters regularly for debris buildup that could cause drainage problems.
In addition to regular maintenance, new shingles should be professionally installed when necessary. A professional roofer can help you maintain your new roof. They may even spot issues before they become major ones. This expertise protects your investment from unnecessary wear and tear caused by improper maintenance, extending its lifespan.
With proper maintenance, your new shingles will last for years, making now the perfect time to consider professional installation and advice.
Professional Installation And Advice
After installing and maintaining the roof, professional installation and advice are needed. The first course of roof shingles must be laid correctly. Nail or staple your starter shingles. Use underlayment between shingle layers to prevent moisture buildup and temperature fluctuations.
Professionally install your shingle system. They have experience selecting the right materials for each job. They can also help you protect your roof from wind uplift and ice damming. Finally, ask professionals about warranty options before choosing a new roof.
Knowing how to install a roof helps it last for years without needing repairs or maintenance. Professional installers also advise on how often certain areas should be checked and maintained to maintain their appearance. This crucial step can reduce future repair costs due to improper installation or inadequate protection measures.
Final Thoughts
To conclude, roof shingles are essential to home maintenance. It's expensive, but the right shingle for your climate can save you money. Tax credits may also reduce costs. Check the manufacturer's warranty before starting any project. Finally, cleaning and maintaining shingles will keep them looking new for years.
This article should help you start a roofing project. Before starting any roofing job, I recommend researching the best shingle for your area, tax credits, and warranties. With proper preparation and care, your roof will have beautiful, long-lasting shingles. So now you already got lots of ideas on how to start shingling a roof.
FAQs
How Much Does Shingling A Roof Typically Cost?
Home renovations require roof shingles. Knowing the average cost can help you budget and plan. What does roof shingling cost?
The answer depends on roof size and materials. Depending on these factors, installation costs $1 to $4 per square foot. Know that professional installers may charge separately for labor. High-end products cost more, too.
Technology has also improved shingle quality. Premium materials last longer than cheaper ones, saving you money in the long run. Researching beforehand will give you peace of mind when choosing the best option for you and your property.
What Is The Best Type Of Shingle To Use In My Climate?
Roof shingle selection can be difficult. There are many varieties, each with pros and cons depending on the climate. However, choosing the best option requires knowing what works best in your area.
Asphalt shingles are the most popular due to their affordability and variety of colors and styles. In extreme weather conditions like heavy rain or snowfall, metal-based shingles may be a better choice due to their durability and wind resistance. Clay tile shingles also insulate, which may lower energy costs.
Always research your climate before choosing a shingle. This extra step will save you money in the long run by preventing you from having to replace them prematurely due to your local weather. Comparison shopping can save money without sacrificing quality.
Choosing the right material for your location—one that's durable and affordable—is the first step to making informed roofing project decisions. You'll have a secure roof if you consider how different types of shingles perform in different climates.
Are There Any Tax Credits Available For Shingling My Roof?
Roof shingling tax credits? When making your home more energy-efficient, ask this question. Tax credits can make reroofing cheaper, so check if they're available in your area.
Many states offer credit for such projects. State-specific credit typically reduces job-related material or labour costs. It can also be used for insulation and windows.
Local government offices or accountants can tell you if your area has tax credits. They should be able to explain credit types and their financial benefits. Research regional online resources, as new programs often appear throughout the year.
Before shingling a roof, research all the benefits, including tax credits, to save time and money.
Does Shingling A Roof Void My Manufacturer’s Warranty?
Whether you're voiding your manufacturer's warranty when shingling a roof is crucial. Nobody wants to pay for expensive repairs they could have avoided. Understanding warranties and roofing procedures can save you money.
Before shingling your roof, consult your manufacturer. Most manufacturers provide warranty details on their websites so customers know what is covered. If you install new siding or windows properly, it may not void the warranty. Each company has its own rules about which projects are covered.
The quality of materials used to shingle a roof may also void your warranty. Your manufacturer's warranty may be voided if high-quality products aren't used or installed properly. For optimal results that don't violate warranty agreements, use trusted brands and hire experienced contractors to install them.
These precautions keep home improvement projects within budget while letting homeowners customize their homes. By being aware of potential issues that could arise due to improper installation methods or low-quality materials, you can avoid unexpected expenses and have peace of mind that all changes were done correctly.
What Is The Best Way To Clean My Shingles?
Cleaning shingles before shingling is crucial. This will improve the look of your project and extend its lifespan. How should I clean my shingles? Here's how:
- Use an appropriate cleaner first and foremost. Make sure this cleaner has been specifically designed for use on asphalt or fiberglass shingles. Avoid using any kind of harsh chemicals as these can damage the surface of your shingle over time.
- After applying your chosen cleaner, scrub with a brush or cloth until all dirt and debris have been removed from each individual shingle. Ensure you cover every area properly so that no residue remains on the surface.
- Once finished, rinse thoroughly with water and allow ample time for drying before you begin installation.
To keep your shingles looking good and lasting longer, clean them properly. To prevent mold and mildew, they must be clean and dry. Cleaning shingles before installation requires quality cleaners and enough time to apply and rinse.