How To Shingle A Roof
If you're looking for a way to spruce up your home and increase its value, roofing is the way to go. Shingling a roof is not only an effective solution for protecting your home from weather conditions, but also provides an aesthetically pleasing look that will make any house stand out amongst the rest. Not sure where to start? Don't worry - I'm here to help. In this article, we'll be discussing how to shingle a roof and provide tips on making it as efficient and cost-effective as possible.
Before shingling your roof, familiarize yourself with the necessary materials. Having everything ready before installation can save time and money. Proper preparation also ensures a great finished product.
After gathering your supplies, start shingling. They must be carefully installed to avoid water damage or structural damage. By following our advice when installing your new roof, you can rest assured that you are protecting your investment.
Overview Of Shingling Process
Any home improvement project requires roof shingling. It's easy but requires careful preparation. Asphalt shingles are a popular and affordable roof covering. It can protect against rain, snow, wind, and other damaging elements for years if done properly.
You must have the right materials and tools before installing roof shingles. This includes gloves, eyewear, sturdy shoes, quality nails, caulk, a hammer, or a nail gun (depending on the type of shingle installation), and enough asphalt shingles to cover the entire surface. Start when everything's ready.
Installing asphalt shingles begins with marking the roof's bottom edge. This line should be level so that each row above is even when installed. Start nailing each strip of shingle up the slope until you reach the top ridge line, overlapping them slightly to seal out moisture. With patience and attention to detail, you should finish professionally in no time. Let's examine how to prepare for our job.
Preparation Before Starting
Before shingling a roof, you must prepare. First, inspect your roof deck. Before adding shingles, it must be repaired if it's in bad shape or storm-damaged. Step two is to secure and seal chimneys, vents, skylights, and other penetrations with step flashing or metal flashing tape.
The third preparatory step is to check the plywood sheathing for protruding nails that could puncture the shingles. Anything above 1/8 inch should be hammered down or replaced with new roofing nails. After these steps, you can start shingling.
Tools And Materials Needed

After preparing to shingle a roof, gather the tools and materials. Starter shingles, asphalt or fiberglass shingles, roofing felt paper, roof cement, and galvanized or aluminum shingle nails are needed. Work gloves, protective eyewear, and a hammer and ladder are also useful.
Get enough supplies for the whole project to avoid delays. Check your local building code to ensure all materials meet it. If you hire someone, make sure they have experience with these types of construction projects and can provide proof of their qualifications. With everything ready, we can start identifying areas to lay new shingles.
Identifying Areas To Shingle
I must identify my roof's shingle areas before shingling. I first check how much of the roof is exposed to water damage. I compare my roof to nearby roofs to understand this. This shows me where water may leak.
Next, decide where to install or replace roof shingles. Before starting repairs or replacements, check all parts of your shingle roof. Before installing, fix weak spots like missing tiles or curling edges.
Finally, I can choose shingles for roof repairs and replacement once I know what needs fixing and where. This will help keep those areas weather-proof.
Selecting Appropriate Shingles
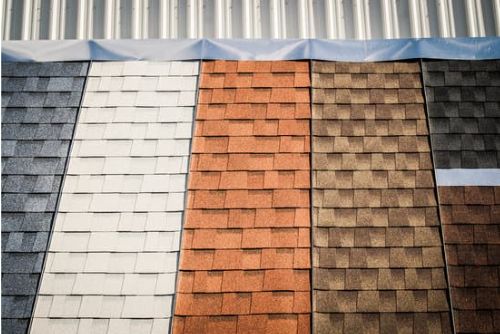
I'll help you choose a roof shingle. Asphalt shingles are the most popular and work well on any roof. They come in many colors and textures, making it easy to match your home's style. Metal or slate shingles last longer. They last longer than asphalt but cost more to install due to their weight and complexity.
Composite plastic and rubberized coatings are also available for unique shingles. These are cheaper than traditional options, but they last longer and protect against extreme temperatures. They're also attractive.
To maximize energy efficiency, choose a shingle that meets local building codes and has proper ventilation. After choosing a shingle, you can estimate how many you'll need.
Estimating The Number Of Shingles Required
Installing a roof is no easy task, so it’s important to carefully plan and prepare before you start. One of the most essential parts of this preparation involves calculating how many shingles you need for your roof:
- Measure the total square footage of the area that needs to be covered in shingles.
- Determine the size of each individual shingle (width x length).
- Calculate the number of bundles that are needed per 100 sq ft.
Now that you know how much material is needed, you can estimate how long it will take and budget for additional materials and tools like nails, felt paper, and ridge cap shingles. Planning saves money and ensures project success.
We're ready to start shingling after careful planning.
Installing Starter Row Of Shingles
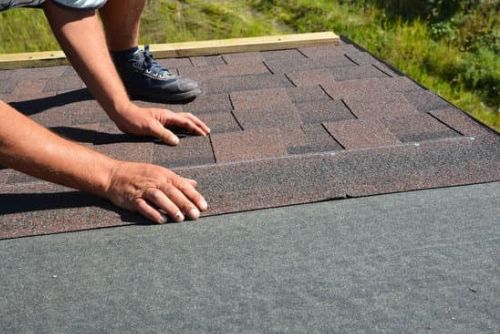
I'll demonstrate roof starter row installation. Pay attention to this important roof installation step on how to shingle a roof. Use chalk or a tape measure to straighten the starter row line. Install an ice and water shield along your roof deck. After trimming the ice and water shield, apply adhesive along its length. Start shingling the starter row. For stability, each shingle should overlap the one below it. This ensures proper roof shingle installation. Take your time and be precise to build a solid roof. To get what you need, we'll calculate the overlap for rows of shingles.
Calculating Overlap For Rows Of Shingles
Now that the starter row of shingles is installed, it's time to calculate the overlap for additional rows. The amount of overlap is critical in properly shingling a roof. To ensure proper installation:
- Measure and mark each successive course of shingles with a chalk line before nailing them into place.
- Each successive course of shingles must have an overlapping coverage of at least 2 inches beyond the preceding one.
- Most packages come with three-tab asphalt shingles, which measure 12 inches wide when laid flat; so you'll need to stagger vertical lines by 4 ½ inches on every other row to achieve the necessary overlap.
As you layer shingles, make sure each row has enough overlap to finish your project. This will prevent water infiltration and costly repairs. With these tips, you can confidently add more shingles and secure them.
Adding Additional Rows Of Shingles
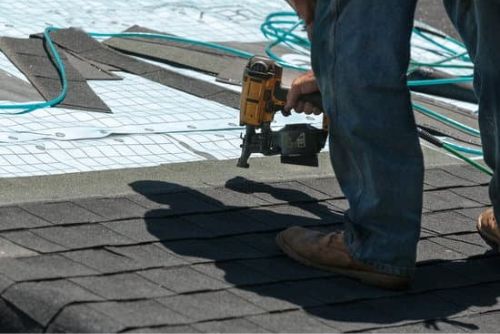
After installing the first row of shingles, add more. Start by measuring your roof's peak and chalking every 12 inches. This will guide layer installation.
Next, install an extra starter course at each mark, making sure its edges match the row below. After that, layer your second layer of shingles directly on top, slightly overlapping them. Make sure they're evenly spaced across each row so the courses don't overlap.
For a precise fit, cut corners and other areas where two pieces meet with tin snips. Check the space between each piece. Your roof installation will look great and last for years if you measure and cut correctly. After this, we can attach the ridge cap to the roof peak.
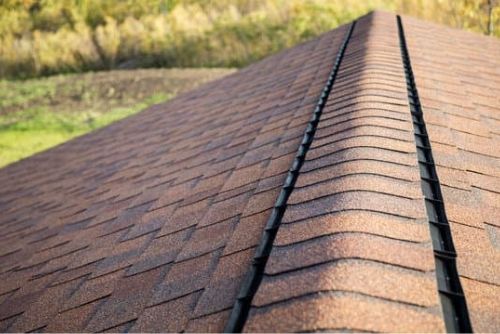
Attaching Ridge Cap Along Peak Of Roof
After adding more shingles, attach the ridge cap to the roof's peak. This prevents water from entering your home and causing damage. Before starting this project, gather drip edges, cap shingles, and nails.
Once everything is ready, lay one row of cap shingles along the roof peak. Make sure they are aligned and fastened on both sides of the ridgeline. Be aware that some roofs need multiple rows for coverage. Apply sealant generously around each shingle to prevent gaps. This prevents moisture from entering and causing issues.
Finally, use a caulking gun to fill any gaps between the cap shingles on your roof. After finishing, check below for air leaks and tight seals. After installing roof ridge caps, pat yourself on the back. Let's secure edges and corners with metal flashing so your new roof lasts.
Securing Edges And Corners With Metal Flashing
When it comes to roofing, metal flashing is an important part of the process. It provides a secure barrier between your shingles and any edges or corners that could be exposed to water damage. Here are 3 key points to remember when installing metal flashing:
- Make sure you use the right kind of metal for your roof replacement project; different types of roofs require specific kinds of metal materials.
- Measure twice before cutting - this will ensure accuracy and prevent leaks in the future.
- Seal all joints carefully with caulk or other sealant material to keep out moisture.
After these steps, install ventilation to reduce heat damage on your new roof. Proper ventilation prevents heat buildup and saves energy by lowering air conditioning costs in the summer. With careful planning and attention to detail, you can enjoy a safe home free from costly repairs caused by poor ventilation and weather protection.
Installing Ventilation To Prevent Heat Damage
Installing a roof should minimize heat damage. Poorly ventilated roofs trap heat in the attic, shortening their lifespan and energy efficiency. Proper ventilation when shingling a roof prevents such issues.
Intake and exhaust vents at the soffit and roof ridge are crucial. Intake vents bring cool air into your attic, and exhaust vents let hot air out, creating a cycle that keeps temperatures comfortable year-round. Airflow around rafters and trusses prevents moisture buildup and extends the life of wood decking.
Use rubberized asphalt membrane or self-adhesive underlayment to seal and caulk properly for weather protection. This will prevent water infiltration from rainstorms or extreme cold from damaging your new roof.
Ensuring Proper Sealing And Caulking Is Applied
Shingles first. For a long-lasting seal and weatherproofing, lay them down correctly. Make sure the rows overlap. This seals out rain and debris. Use roofing felt between shingle layers. This helps prevent fire, wind, and moisture damage.
Sealing and caulking. After installing the shingles, seal the exposed edges with roof protection. Roof Protect is made of rubberized asphalt, sand, and gravel, making it durable and reliable for roof protection. Follow the manufacturer's instructions when applying roof protection to avoid gaps and moisture entry. After applying the roof protector, check it frequently to prevent cracks and dents from forming.
No matter how well we prepare to install new shingles on our roofs, we should check for damaged or missing shingles after every storm season in case we missed something. Missing or damaged shingles can let moisture into our homes, causing mold and wood rot—two costly issues no homeowner wants to deal with.
Inspecting For Damaged Or Missing Shingles
Check for missing or damaged shingles regularly. Old shingles can crack easily, so check them often. The most vulnerable roof areas are around chimneys and skylights. Discolored patches may indicate water damage or mold growth.
To keep your roof waterproof, replace broken or missing shingles immediately. Use quality materials with proper ventilation and install them properly to ensure they fit properly and last longer than cheap alternatives.
Finally, quick repairs prevent further damage, which is essential for regular roof maintenance.
Maintaining A Regular Schedule Of Roof Maintenance
Maintaining a roof maintenance schedule is essential. Preventive measures will help your new roof last longer. Here's what I recommend when it comes to keeping up with regular roof maintenance:
- Have an annual inspection done by a professional. This can alert you to any potential issues before they become larger problems.
- Clean out gutters regularly - clogged gutters can cause water damage which can lead to premature replacement of your entire roof.
- Replace broken or cracked tiles as soon as possible – this helps reduce the spread of further damage and prevents costly repairs down the line.
- Check flashing around skylights, chimneys, and vents for wear & tear - replace them if needed so they don’t let moisture in and create even bigger headaches later on.
- Keep trees trimmed away from your roof- overgrown branches are susceptible to falling during storms & high winds, possibly damaging your new roof.
Regular inspections and maintenance aren't fun, but they're important. Doing these small tasks now will save you money since you won't have to replace large parts of your roof due to neglect or preventable damage. So do yourself a favor and check your rooftop each season, make necessary repairs, and keep those pesky critters away.
Final Thoughts
In conclusion, shingling a roof is an important job that requires careful thought and planning. It's essential to choose the right type of substrate for the roof, as well as the appropriate type of shingle. The cost can vary depending on the size and shape of your roof, so it's important to estimate accordingly. The installation process can take anywhere from one day to several days depending on the complexity of the job, but with care and attention you should be able to complete it within a reasonable time frame. Finally, ensure that all gaps are sealed properly in order to protect against water damage and other weather-related issues.
This article should help you on how to shingle a roof. Consult a professional contractor if you have any questions about the project. They'll make your new roof last.
Always prioritize safety when working on such projects. Wear protective gear, follow instructions, and never try anything beyond your skill level.
Frequently Asked Questions
What Type Of Roofing Substrate Should I Use?
Before roofing, you must consider many factors. Which substrate should you use? This will affect your shingle roof's performance.
Choosing from so many options can be difficult. Don't worry—with some research, you'll find the best option. Consider your climate first, as some substrates perform better in certain climates. Consider the local building code and other requirements.
Finally, consider how much time and effort you want to spend maintaining your substrate over its lifespan. Some materials last longer without maintenance, while others need it. Knowing its environment and care will help you find the right substrate for your shingle roof.
How Do I Know Which Type Of Shingles To Buy?
When it comes to shingles, there are so many options out there that choosing the right one can be a daunting task. But don't worry - with some research and guidance you'll be able to figure out which type of shingles is best for your roof. Here's what you need to know in order to make an informed decision.
Consider your climate and how much sun your roof gets daily. This determines if asphalt shingles are right for your home. Asphalt shingles are cheaper, but extreme temperatures damage them. If you have cold winters, wood shake shingles are better insulated and last longer than asphalt ones.
Durability and fire resistance are also important when choosing shingles. You need something that can withstand hail, high winds, and fires. Metal roofs might provide excellent safety from both elements since they're highly resistant to damage caused by heavy rains and wind gusts while also providing excellent heat reflection abilities during hot months.
Before buying, make sure it meets your budget and building codes. After choosing everything, thorough research makes installation easier. This way, you'll guarantee the job's completion without surprises.
What Is The Best Way To Estimate The Cost Of The Project?
Estimating a project's cost is difficult, especially if you're unsure. Estimating costs before shingling your roof is crucial. Estimating the cost ahead of time ensures that everything goes smoothly and prevents unexpected costs.
Estimating a roofing project budget requires researching shingle types and prices. Customer service representatives at many home improvement stores can recommend products based on budget and needs. Many online resources provide detailed information about different types of shingles, which can aid decision-making.
Labor costs are another budgeting factor. Depending on the scope and complexity of their projects, some experienced DIYers may choose to do this themselves, while others may hire contractors or specialized roofers. Before signing contracts with professionals, get clear estimates from qualified companies and ask for references from previous customers. Researching beforehand saves time and money.
If you plan ahead, roofing cost estimates are easy. Start by researching shingles that fit your budget, then look into contractor services or specialized roofers with experience in this type of work—don't forget to ask for referrals. With careful planning, you can create a successful plan within your budget.
How Long Does It Typically Take To Shingle A Roof?
Many home improvements require roof shingling. How long does roof shingling take? Everyone asks that when considering such a project. This article will discuss the factors that affect this task's total time.
Shingle time depends on roof size. Due to labor, installing more material takes longer for larger surfaces. Removing layers of shingles or other roofing materials can also take time.
Experience—yours and your assistants'—is also important. If you've done this before, you probably know what to do and how long it should take. If not, allow extra time for trial-and-error. If you hire contractors or handymen, their experience can reduce the overall time it takes since they will likely know exactly what needs to be done and where mistakes might occur, so they can avoid them.
The size of the roof, the number of layers, and your hired help's skill level all affect how long it takes to shingle it. Considering these factors during planning helps create an accurate timeline, so work goes smoothly.
How Do I Know If The Roof Is Properly Sealed?
Sealing a roof before shingling is crucial. This will keep your roof leak-free and weatherproof. How do you check the sealant's application?
Checking shingle gaps and roof edges is crucial. The sealant may not have bonded properly if there are gaps. If the roof appears worn, the sealant may be failing. Water stains indicate that moisture has entered an uncaulked shingle joint or gap.
Use a flashlight to inspect key areas, like where two sections meet at a peak or valley, to determine if your roof is sealed. Check joints between walls and eaves troughs or flashings, which keep water away from rooftop chimneys and vents. Finally, watch for weak spots caused by temperature changes or age-related degradation of asphalt shingles. Regular checks and prompt repairs will ensure your roof is properly sealed, protecting you and your home from bad weather.